
A couple of you have asked me how I go about making art from my prints--well actually, it's nothing new or different. I know a lot of artists use their prints to use in many different forms (ie. clothing, ceramics, jewelry, etc. and even boxes ; ), but I like to take them and make all new art pieces. This comes in handy when you don't have a lot of time and you need to produce (like the last 2 weeks, for example) Here are a couple of pieces that I just made last week, and they really didn't take that long. These are my original garden girls that I posted in the beginning of the summer--


So I decided that I wanted to do something with these 2. And when I make copies, I don't go to a copy place or anything. I just print them out on my printer. I am no expert when it comes to any of this stuff, especially printers. I just know that I love mine, and the copies are pretty true to the color--a little different, but no one would know that, except me. Also, I don't scan any of my art ( I don't think I've made anything flat enough to fit in a scanner, to tell you the truth) I just take a lot of photos everywhere I can find good light--inside and out until I'm happy with the results. My printer is a Canon MP600, which means nothing to me--I just know that it produces good resolution--listen to me--acting like I know what I'm talking about. And I do love my camera. It's a Sony Cyber-shot--not the best, but still pretty good. I'm actually hoping to upgrade soon. And before I printed them out, I decided to fool around with the color a little bit. I wanted the color a bit more muted.
.JPG)
.JPG)
What I did was fool around with the saturation (this is on my program from my Sony camera)--I just took out the brighter colors and their skin tone. The girl on the left is now a brunette.
And what I decided this time was to look for co-ordinating papers that would compliment these. 

On this one, I also printed out another piece of my artwork (the houses) Those houses were from the one table that I made. I found, with my camera, that instead of cropping photos, it's better just to take a lot of close up shots.
I like to print out my art on this card stock that I get from Staples (office supply store). It's nice and thick--110 lb. I use the cream color, but there are many color choices there, and of course you can just use white. And when I want to decrease the size of the photo, I usually use the Windows program that is free if you have Windows, and everyone does if they have a PC. The program is called the Windows Picture and Fax viewer, and it gives you 5 different size options. And if I don't want to us those sizes, I just use my printer program on my computer to decrease the size of the photo that way. (I hope I'm not confusing anyone even more)
This first one was completely inspired by Teresa Magel. She is now one of my favorite artists. I first found out about her when Lisa from The Wright Stuff blogged about her and some other artists. I adore her faces, and how she uses them in her mixed media collages--in this fashion--

I also wanted to tell you that the way I adhere the images onto my surface is with gel medium and then cover it also with that or matte medium. And yes, the colors run a bit, but not much, and I really like the smudgy, shabby look, so that's good for me. But I have sprayed a workable fixative on the copies, which keeps them from running. On these, I didn't do that.
I wanted to put my own style into this piece also, so I put the collage on 2 1/2 inch wrapped canvas--this was one measures 9 x 9. These are so cool--they look like hanging boxes.


I stenciled these on with Golden's light molding paste, and then just painted them.
And I used a cupboard door face plate also using Basic Grey glazed brads to attach it to the canvas.
 Plus the coffee-stained doily. How I adhere these doilies or lace or any material for that matter, I do it with matte medium, and cover it with the medium also, and in this case, I used a very watery acrylic wash of paint in random spots. And then I just seal it up with the rest of the piece. Lately, I've been on a shiny kick. I would always seal everything with a satin finish sealer--now I've been using a gloss varnish on everything. It covers the fiber very nicely--it adds a great texture to the doily--almost like sculpture.
This first one was completely inspired by Teresa Magel. She is now one of my favorite artists. I first found out about her when Lisa from The Wright Stuff blogged about her and some other artists. I adore her faces, and how she uses them in her mixed media collages--in this fashion--

I also wanted to tell you that the way I adhere the images onto my surface is with gel medium and then cover it also with that or matte medium. And yes, the colors run a bit, but not much, and I really like the smudgy, shabby look, so that's good for me. But I have sprayed a workable fixative on the copies, which keeps them from running. On these, I didn't do that.
I wanted to put my own style into this piece also, so I put the collage on 2 1/2 inch wrapped canvas--this was one measures 9 x 9. These are so cool--they look like hanging boxes.

I also added my extra collage elements on like these roses--

I stenciled these on with Golden's light molding paste, and then just painted them.
And I used a cupboard door face plate also using Basic Grey glazed brads to attach it to the canvas.


I'm never sure how these collages will turn out, but I was loving this one every step of the way! And as far as the printed image, once it's collaged on and all dry, I always add color to the eyes and lips, and use a fine point pitt pen to bring out details in the eyes, nose and mouth. Sometimes I'll do more with the hair and skin-tone, but not on this one or the other one either.
And speaking of the other one, I decided to keep her face whole and combined it with this scrapbook paper with the bird image--they went well together.
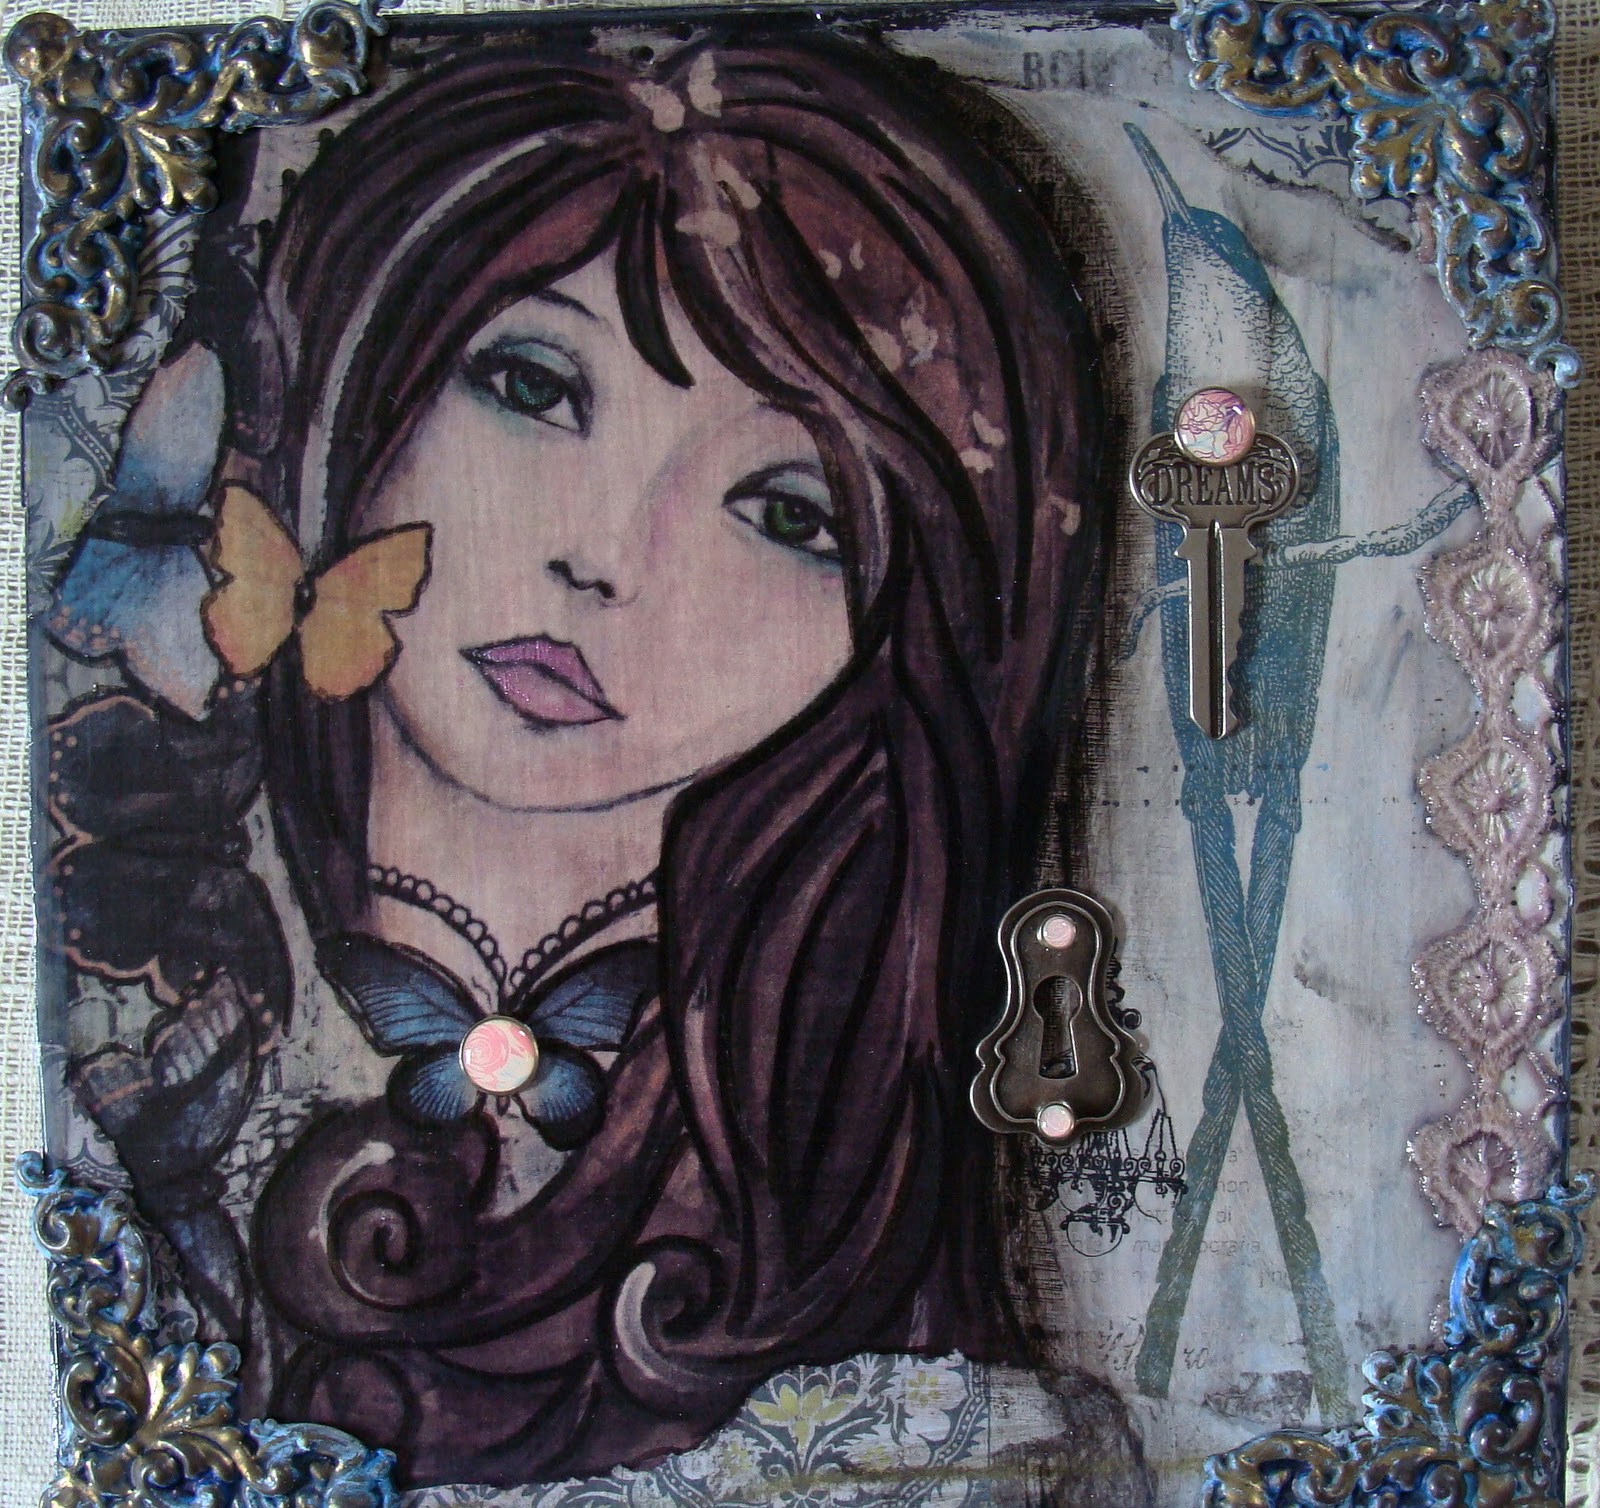
And on the sides is where I put some of my house prints on--

I really liked the brass corners that I added. These corners were completely black when I started out with them. So I cleaned them up, but they didn't clean up very well, so I first put some Amaco antique white rub'n buff on them and then some Blue Stream Alcohol ink over that, which was very intense. So then I just rubbed a lot off with 91% alchohol, and it brought some of the shiny brass out--
 ----exactly what I was going for!
And a big Thank You to Tim Holtz and Basic Grey for these very cool embellishments--

So in the end--these are prints of my art, but yet still original art pieces-


This is only one way that you can print out your art. Another way is with Lazertran Transfer paper for inkjet printers (they also have it for laser printers too). Lazertran is decal paper. Once you print your image out on this paper, you soak it no more than a minute in water and it slides right off, and it's a bit transparent. But you can make it really transparent if you follow the special directions that come with the Lazertran papers. I have yet to do this, but I've printed out on Lazertran before. I use it sparingly, because it's costly. Or I have tried printing out on scrapbook papers also. This you have to fool around with, because it doesn't always look good. As I experiment with new ways, I'll be sure to post them. And if I missed anything about how I do this, just ask me!!
And one more thing--I want to thank Regina from RGR Designs for this--

54 comments:
How very cool! I've never thought of making art with printouts of my art! You are so clever and these two new pieces are just beautiful!! I love how you work so three-dimensionally. I'll have to branch out a bit, I think... Hugs, Silke
What a fascinating post that was, and again you are so generous to take the time to share with us the details of your process. My jaw dropped when I saw where you were headed with the print + coordinating papers--last fall there was a large 2-day art festival here in Austin, Texas, and I happened across this one booth that I just had to leave with something, anything, but I didn't have much to spend. I ended up with a 4x4 hanging piece by this artist, and I keep it right by my work area. It is "Flowers & Insects" by Teresa Magel, one of her mixed media collage pieces. I really like how you took the same concept and made it your own, especially with those stencilled roses. It's very Diane!
You are absolutley THEE Creative.
These pieces are fabulous. You are so good about telling how you accomplish these beauties. :) Great post.
Thank you for sharing these detailed instructions, Diane. I hope to apply your tried and true techniques to reuse some artwork soon. The Lazertran paper sounds like something fun to try, as well. BTW, I LOVE how you use lace and doilies in your pieces with the glossy finish; it adds a beautiful touch. Big Hugs and Thanks ~~ Jeanne
Oh yes I love Teresa's work - your interpretation is wonderful Diane and you've inspired me to try new things with existing creations when I don't have the feeling to make something new. You have such a wonderfully creative imagination Diane - you're a real inspiration!
I love how you made new art with the old art. Gorgeous pieces.I love all the details you add on. Thanks so much for the tutorial.
Oh wow, thank you so much for this. I learned alot. Your work has an "I wanna touch it" quality to it. What you did with you prints is so creative and it's so inspiring. Thanks again
T
What an awesome idea! I have NEVER thought to do this! Love the new pieces. Your work is always a feast for the eyes in color and texture. Thanks for showing us this technique.
Diane you are so awesome at sharing all your knowledge, I love your little 'how to' blog posts!!
Awesome work
Micki x
I am glad I understood most of what you said, I have not used some of the products you mentioned, I do like alcohol Ink.
The thing I always think of when I see your work especially the boxes is how you get everything so measured and so straight. It is always so perfect, neat, no smears or gobs just the best workmanship to detail and perciseness. (if that is a word)
I do love to work with the saturation and have a plan for quilting with somne of that low color. I notice that often people at shops or fairs do not even notice it isn't the same art as the original as they are about searching for color and the look of the work. I know tho that others really like to have the original piece. You do know I am sure that you can print your work out on fabric , yes i know you know that because now I remember the conversation about sewing and it not a favorite thing.
I di really like reading all this information. and BTW your camera does a great job. I am still working with that part of this work. It is amazing to me how different the photos can look.
Your a fun person Diane.
Diane, thank you for sharing your process with us. I love the way the pieces turned out and now I can't wait to get my space back and get busy. I have used lazertran paper and love it!
Great post! I love seeing what you do cause it's always so so good! Patsy from
HeARTworks
Great tutorial, I totally enjoyed that.
Love seeing how you use prints of your work. Do you add any additional paint to your faces?
Diane, you are amazing! I love these! Thanks for directing us over to Teresa's site, that was a joy to see! I definitely want to try this!
Wow, what a great tutorial Diane. You just helped me out with ideas on decoupaging a metal cabinet I have in the studio. I think I will use copies of all the ladies and just do the whole cabinet and add other things. Thank you, thank you, thanky. :)) Have a great Wednesday.
Wow, Wow, WOW!!! Your description of using your prints to make more original pieces is fabulous! Thank you so much for sharing your expertise, Diane! Your pieces are beautiful!!! Hugs, Terri xoxo
How generous of you to share all this info with us. I appreciate knowing and seeing how you create start to finished your beautiful art.
I learned many new things here today. Thanks, such is the beauty of blogging!!!
Always something good to find here Diane! Thanks for being so generous! I wish I could've come to your show, glad it went well.
Much Love,
Jenny
That was AWESOME. I photograph pretty much everything I do, but I hadn't thought of reusing prints in new art work. I'm inspired! :)
I think this is just fantastic Diane! Wonderful post and thank you so much for sharing. Talk about inspiration .... what a great inspiration you are! Lovely work!
Thank you so much for always taking the time to visit my blog and for all the nice comments you leave. I appreciate each and every one of them!
Have a wonderful day!
Hugs
Ansota
Thanks for giving us a peek at how you leverage your art. It's something I know very little about. First I guess I need to have some wonderful art pieces like yours....that might be my problem!!
Fantastic, and thank you for explaining the 'how-to'! Sofar I only used my printed art on artist trading cards, and I glue them with medium and finish with a layer of clear gesso. Great to further work on and gives a nice texture. If I let my inkjetprints dry for 24 hours, the paint doesn't even run ;-)Anyway, love your art again, as usual !
This was a fun post! You really have a knack for stiring up the muse. Thank you for sharing.
LOOOOOOOVE both of these pieces :) Thanks for sharing !!!
Wow, you are so inspiring Diane, thanks for talking us through the process. It makes my fingers itch to go and create something!
Beautiful pieces, I especially like the roses. xxx
WOW - these creations are just amazing. I love that you fashioned new art from your existing art. So lovely, Diane! :) And thank you for explaining how you create these pieces and where you find inspiration from. :) Theresa
Hi Diane...thanks for the info about recycling art...I'm sorry I don't get by very often but every time I do...I'm in awe of how much art you produce and the quality of it...great art pieces!
Mary
just gorgeous diane! thanks for the tutorial on how you do this. it is always fun to use prints and you really make them unique and special. precious works of art! have you beaded your pendants?/
xoxo
I really enjoyed reading that! Have you ever thought of writing a book about how you create your magical, perfectly wonderful pieces of art?
wow, these are amazing! How cool that you can make so much art from one original piece :)
Although I'm really late getting here, I sure appreciate all the advice you gave in this post. I was really impressed with how much your changed the original art to something completely unique. Each step was detailed perfectly and I really enjoyed your process. Stunning art and such a generous post!
thanks for sharing these step by steps. so useful and inspiring! your art is beautiful!
The detail you gave in your tutorial is just as precise as your beautiful artwork. Thanks so much for sharing your process. The two original art pieces you made from your prints turned out so lovely. I'll bet they will sell at your next show..and quickly.
Thanks again,
Cheryl
Beautiful pieces D! Always inspiring! Very interesting reading about your methods and learning about other artists out there. Have a great Thursday:)
Absolutely gorgeous! I love the idea of "reusing" your own artwork, and changing it up a bit.
Love the whole process and love to learn something new. I always forget I can redo my art in different ways in the printer... sheesh. I have an equivalent Canon too and it works great (after I learned to copy on best - not normal, that took awhile). Thanks for dreamin' big with me - your dreams really are coming true!
Gosh Diane! I love this! I really need to make a few copies and see where it takes me. Thanks for the inspiration.
Hugs
Lisa D.
I just love your blog! I love how you share your techniques so generously...still intimidates me, but I love to know how all of this is done :) Love the colours of this one and I am sure someone will snatch it up right away...can you please put some art on etsy...I would definitely buy some pieces :)
Diane, thanks, for this "tutorial" so great to get new ideas, dear-so wonderfull how you added the laces with gel medium, and use this medium for all kind--we can buy that here,too---only it is kind of expensive...
XO, Dorthe
I loved reading this post. Such an interesting way to re-use your artwork. As original as the original painting is. Very creative! xo
As always I am inspired. Thank you for volunteering so much information through your blog. I always learn something in the reading of it.
These pieces are amazing!
Hi! Thank you so much for stopping by my blog, because it brought me here to see your wonderful artwork! I especially love the last 2 pieces! beautiful and I really like the idea of using prints of my work to make more art. Also, yes, I HIGHLY recommend taking the Texture Town class, esp. since I see you like texture too!
xoEsther
This turned out great! I like this so much, I'm going to try it. Thanks for sharing your inspiration, Teresa Magel. Her work is wonderful. And thanks for stopping by my blog and commenting. I find it encouraging. It is very appreciated.
What fantastic tutorials! I love these ideas and will have to try this with some of my art. I have originals that I get attached to and love that I could apply copies to canvas in a new way.
Thanks for sharing!
Diane these are great! I love your girls! Your work is always so cool! I love how you stenciled with molding paste to make those flowers!! I am always learning something new when I come by and visit you!
Thanks for your blog comment! :)
Hi Diane!Just wanted to pop over and say hello and a big THANKYOU for your lovely comments and joining in my giveaway! :)I wish you luck!
Can i just say Wow! I'm sooo in awe of your artwork and your creativity in re-creating with them. There are so many techniques installed in just one piece...amazing! I must go and peruse the rest of your fantastic blog! :)
Fascinating! Your amazing ideas are ever full of great creativity. I love the new /old images, you are a great talent and so inspiring.....beyond my reach.
Have a nice sunday,
hugs Anja
This post has got to be one of my all time favorites! Wow! There are no words for genius and creative mind.
Your work is so fantastic, and ever so inspiring!!
Hi Diane!
Just found this and i really learned a lot and was inspired by it all! Thank you so very much for reaching out and teaching us!
Thank you for this useful tutorial !
Freakin' wow! This is an awesome tutorial and I just love what you did - originally and with your re-vived art. Thanks for sharing!
Post a Comment